In Windows, a watermark for test mode appears. There is a simple process to remove test mode in Windows or remove Windows 10 pro test mode. There is an easy way to get rid of Windows 10 Pro test mode on a computer or laptop, by simply using command prompt.

Table of Contents
ToggleIntroduction
Welcome to this comprehensive guide on how to remove Windows 10 Pro test mode. If you’re encountering the “Test mode Windows 10 Pro Build” watermark on your desktop, you’ve come to the right place.
This article will provide you with step-by-step instructions, tips, and insights on removing the test mode and ensuring a seamless Windows 10 Pro experience. Let’s dive in and learn how to remove Windows 10 Pro test mode effectively.
What Is Windows 10 Test Mode?
Windows 10 Test Mode is a temporary Windows state that helps developers perform certain tests on software and drivers. Developers can evaluate the real-time performance and examine how to develop the software for use.
This mode is specially designed for professional developers; as a normal user, you’d better turn off Test Mode Windows 10 because Windows won’t perform any security checks when this mode is enabled.
Read also this: – How to disable pin in Windows 11 and enable password
How to Remove Windows 10 Pro Test Mode
The test mode appears on the Windows desktop when an application is installed in the test phase since it uses drivers that Microsoft does not digitally sign. You can disable this by following the steps below.
Overview of Windows 10 Pro Test Mode
Before we proceed with the removal process, let’s understand what the Windows 10 Pro test mode is. The test mode is a feature in Windows 10 Pro that allows developers and software testers to install and test unsigned drivers without enforcing driver signature verification.
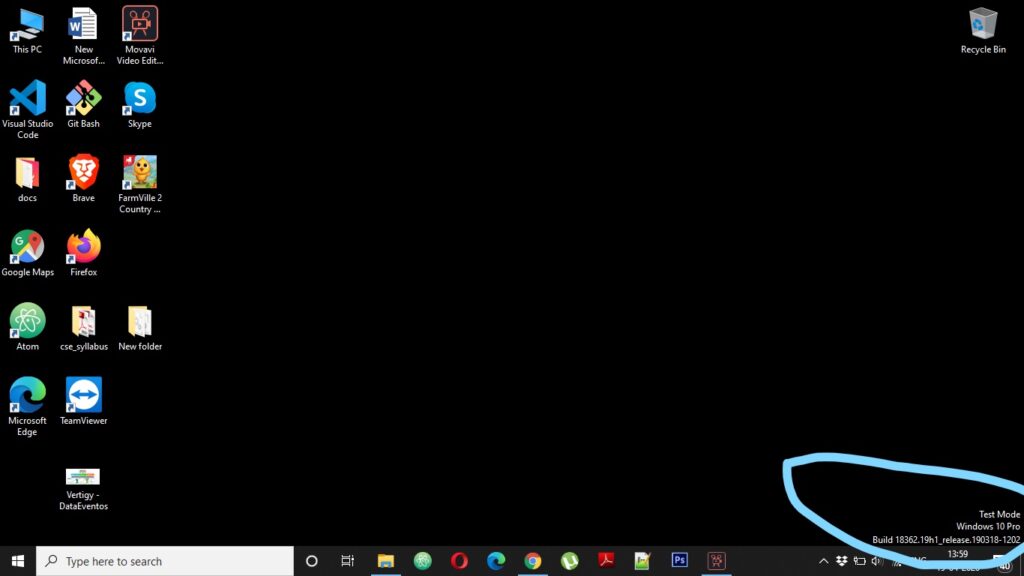
While this mode is essential for developers, it may not be desirable for regular users as it displays a watermark on the desktop, indicating the system is in test mode.
Step 1: Launching Command Prompt as Administrator
To begin the process of removing the test mode, we need to launch the Command Prompt as an administrator. Follow these steps:
- Press the Windows key on your keyboard.
- Type “Command Prompt” in the search bar.
- Right-click on “Command Prompt” and select “Run as administrator.”
Step 2: Disabling Test Mode
Once the Command Prompt is open, we can proceed with disabling the test mode. Execute the following command:
bcdedit /set TESTSIGNING OFF
This command disables the test signing mode, which is responsible for the test mode watermark on the desktop. After executing the command, you should see a confirmation message indicating the test signing mode has been turned off.
Step 3: Restarting the Computer
To ensure the changes take effect, it’s crucial to restart your computer. Save any ongoing work and proceed with restarting your system. Once the computer restarts, the test mode watermark should no longer be visible on the desktop.
Easy way to remove test mode from computer or Laptop
The test mode appears on the Windows desktop when an application is installed in the test phase since it uses drivers that Microsoft does not digitally sign. You can disable this by following the steps below.
Steps to Remove Test Mode in Windows
- In the search box type cmd.
- Right-click Command Prompt, and then select Command Prompt/PowerShell as an Administrator.
- The User Account Control window may appear, if so select Yes.
- In the Command Prompt window, type the following command bcdedit -set TESTSIGNING OFF
- press Enter.
Additional Tips and Troubleshooting
Checking Test Mode Status
If you want to verify whether the test mode is enabled or disabled, you can use the following command:
bcdedit /enum | findstr "TestSigning"
Executing this command will display the current test signing status. If it shows “TestSigning: No,” it means the test mode is disabled.
Removing Unsigned Drivers
If you have installed unsigned drivers while the test mode was enabled, it’s recommended to remove them to maintain system security and stability. To remove unsigned drivers, follow these steps:
- Press the Windows key + R to open the Run dialog box.
- Type “devmgmt.msc” and press Enter to open the Device Manager.
- Locate the device with the unsigned driver.
- Right-click on the device and select “Uninstall device.”
- Follow the on-screen instructions to complete the driver removal process.
Read also this: –
A Brief History of Windows Timeline You Should Know
Conclusion
In conclusion, to remove test mode watermark in Windows is a straightforward process that can be accomplished using the Command Prompt.
By following the steps outlined in this guide, you can effectively disable the test mode and enjoy a clean desktop experience without the watermark.
Remember to restart your computer after making the necessary changes for the modifications to take effect. Say goodbye to the test mode watermark and enjoy a seamless Windows 10 Pro experience.
Frequently Asked Questions (FAQs)
Q1: How can I determine if my Windows 10 Pro is in test mode?
A1: To check if your Windows 10 Pro is in test mode, simply look for the “Test mode Windows 10 Pro Build” watermark on your desktop. If it is present, your system is in test mode.
Q2: Is it safe to disable the test mode?
A2: Yes, it is safe to disable the test mode. Disabling the test mode will remove the watermark